Project Guidelines/Creative Brief
Overview
Your client is a Pixar Executive (your instructor!). Pixar is going to introduce a new superhero in the upcoming Incredibles sequel. You get to first channel your inner Edna Mode (ha!) and design the logo that will be on the chest of the new character and then create a poster that promotes the new movie and new character!
See the Resources Page for files, sheets, how-to’s, etc. to complete the following steps. The Animation Workflow page also has some helpful resources.
Part 1 – Logo
Design a logo for the next INCREDIBLES sequel. Among other things, this logo may be used as a patch on the shirt/chest of the next Superhero to be introduced in INCREDIBLES 2. The logo should look good in gray scale as well as in different sizes. Get screen shots and publish to Behance to show your logo in different sizes and in gray scale. For the logo, you are NOT designing a flyer—keep it simple. Imagine it on the chest of the new superhero’s costume – it will be simple and striking, easily visible and discernable from a distance. It should look good at no more than 200 pixels wide, but also be able to go bigger and look good when needed.
Rubric
Grading Rubric-Logo
Steps
- Do some research and start up a Pinterest board to collect inspirations for your logo. (Like this: https://www.pinterest.com/kritterbee/2d-superhero-logo/) You should be looking at other logos to see what’s been done in the past, but you should also be finding other images that will help you make your design. For example, let’s pretend that during the sketching you did in the previous lesson, you drew a symbol or other item — maybe it was a lightning bolt, a volcano, a dolphin, a plus sign, a big “T”, or anything! 🙂 Collect some images of the symbols that you might get ideas from when you build your logo in Illustrator and put those into your Pinterest board. These will be great references while you’re drawing/designing in Illustrator.
- Finish sketching your other 2 prototype logo designs. These should be very different, not just color or other simple changes from one to the other. Go back to your notes/sketches that you made when you went through the Logo course on PluralSight. These sketches are rough concept art — they should not be fully developed yet.
- Make a new project in Behance called Logo Creative Blitz and post your sketches into it. Also post a link to your Behance project in the Weekly Chat and ask your peers for feedback on your sketches.
- Use the Adobe Color tool (formerly called Kuler) at https://color.adobe.com/ to help you decide on your color scheme. Here’s a video that shows how to use this tool: https://screencast.com/t/dn0Froo5pD Note: Adobe Color will show you several colors in each color scheme option, but you may only decide to use two or three of the suggested colors. Take a screenshot of your planned RGB codes and put it into Behance in your Logo project…
- Ask your client, the Pixar executive, to approve one of your sketches for development. (The Pixar executive is your instructor.) Upon approval, work on creating it in Illustrator and using two or more of the colors in your planned color scheme.
- Put screenshots of the vector-based Illustrator file on Behance. Share it in color and in black and white. Also share it in small, medium, and large sizes to show that it scales well.
- In Behance, provide the RGB codes for the color scheme you actually used– if you changed from the ones you posted in Behance previously, go back to the Adobe Color CC tool and choose “Custom” and enter the RGB or Hex codes of the colors you actually used. Here’s how to find out what the RGB and Hex codes are by clicking on items in your Illustrator file: https://screencast.com/t/zxOzXXZJo
- Share link to your Behance logo project with students in the Weekly Chat – ask your classmates to share suggestions. Start tweaking your logo based on their suggestions…(12 hr)
- Print the Rubric for the Creative Blitz. Do whatever you can in 3 hours to improve your logo design before delivering it to your client.
- Do a Self-Evaluation by filling out the Rubric.
- Publish your final Creative Blitz Logo screenshot to your Behance portfolio. Write a reflection in Behance to explain what you wanted to do for your target audience and why you made the design choices you did.
- Why did you choose the color scheme, etc.? Refer to the Graphic Design Principles to discuss your choices using some of these industry terms: balance, contrast, unity, variety, emphasis, line, movement, rhythm, pattern, etc.
- Also, do a quick (1-3 minutes) IShowU video discussing your choices and how you designed the logo. Provide a link to the video.
- Payday–Schedule a time for final review/delivery/payment from the client (your instructor in this case!), and submit your work for a Quack Award.
Part 2 – Promotional Poster
Design a poster that incorporates your logo and promotes the INCREDIBLES 2 sequel, to be released Summer, 2018. Develop a brand, color scheme, and include your final logo design on the poster. Include the release date, and make up some information for the teaser/poster that will be appealing and introduce your character, its superpower, and the sequel. Don’t try to match the style of the Incredibles movies — do something in a style that you think will appeal to your target audience — you get to brand this poster.
Rubric
Grading Rubric-Poster
Steps
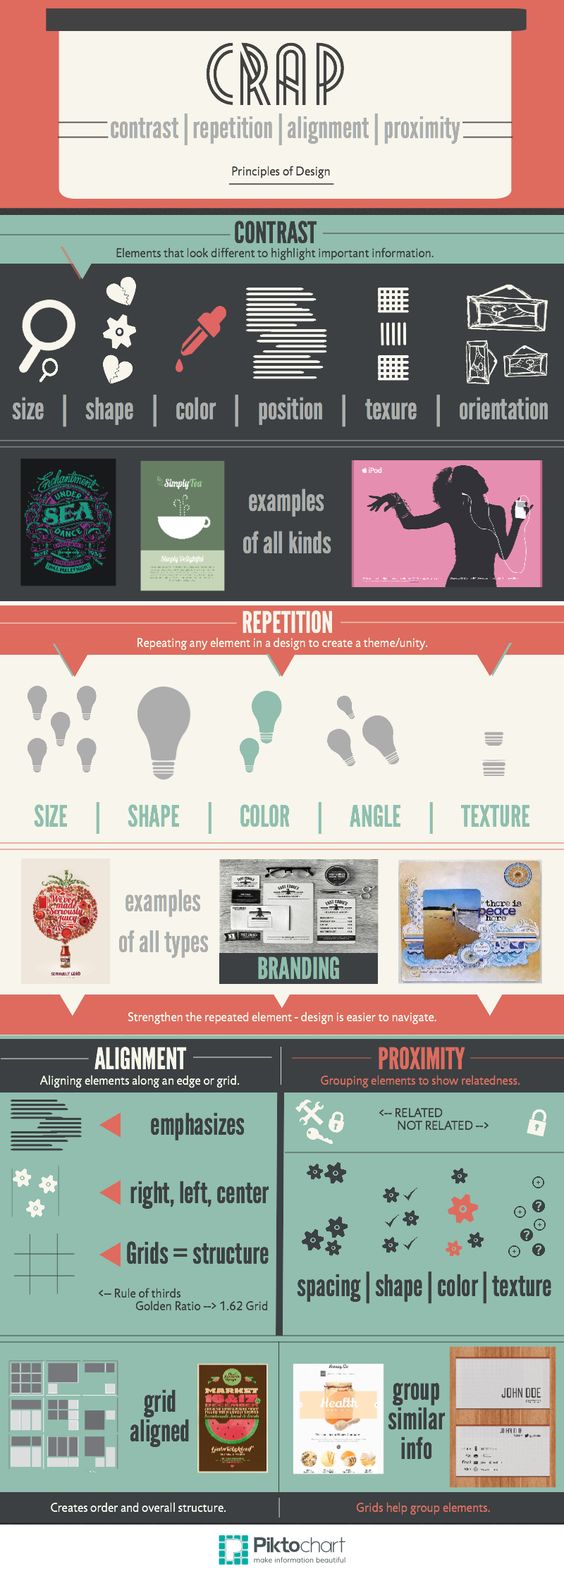
- Review the principles of Graphic Design and CRAP here: https://vwo.com/blog/crap-design-principles/ Make sure your poster follows these rules!
- Now that you’ve taken a look at the principles of graphic design, it’s time to think about how you can you use those in Photoshop to design a great poster for your Creative Blitz! Your poster will promote the INCREDIBLES 2 sequel, to be released Summer, 2018. Check the Creative Blitz page and the Poster Rubric to see what you need to accomplish. Here’s an excerpt about this project: Design a poster that incorporates your logo and promotes the INCREDIBLES 2 sequel, to be released Summer, 2018. Develop a brand, color scheme, and include your final logo design on the poster. Include the release date, and make up some information for the teaser/poster that will be appealing and introduce your character, its superpower, and the sequel. Don’t try to match the style of the Incredibles movies — do something in a style that you think will appeal to your target audience — you get to brand this poster.
- Do some research to see the elements of a movie poster. You may even want to see what resources there are in PluralSight or elsewhere. I found this course: Creating Movie Poster Concepts in Photoshop (PluralSight) and you might find one in Lynda.com too. Share a cool link in our Weekly Chat board.
- Start up a Pinterest board with images that you find when you do a Google search. Put movie posters into the Pinterest board that have elements that you like. (Here is a board I made: https://www.pinterest.com/kritterbee/animationdesign-movie-posters/)
- Use your tablet or pencil and paper to sketch small thumbnails to brainstorm ideas for your poster layout. If you use pencil and paper, take a picture of your thumbnails. Post your ideas in your Behance project for your poster Creative Blitz.
- Share a link to your thumbnails in the Weekly Chat.
- Comment on at least 4 other students Poster project ideas.
- You’ve done some research and thumbnails and asked for peer feedback. Now, ask your client for their approval to develop one of your ideas.
- Create a color scheme in Adobe Color CC and paste a screenshot of it into your Behance poster Creative Blitz project.
- Develop your poster in Photoshop using the graphic design principles:
- Put a screenshot of your final poster into your Behance Poster Creative Blitz project. Write text to explain your design choices and how you created your poster. Use the graphic design terms from the principles above to show you know the vocabulary of this field.
- Put screenshots of the Photoshop file on Behance. Share it in color and in black and white. Also share it in small, medium, and large sizes to show that it scales well.
- In Behance, provide the RGB codes for the color scheme you actually used– if you changed from the ones you posted in Behance previously, go back to the Adobe Color CC tool and choose “Custom” and enter the RGB or Hex codes of the colors you actually used. Here’s how to find out what the RGB and Hex codes are by clicking on items in your Photoshop file: https://screencast.com/t/zxOzXXZJo
- Make a 1- 3 minute IShowU video explaining your design choices and process.
- Print the Poster Rubric and do the self evaluation.
- Payday–Schedule a time for final review/delivery/payment from the client, the Pixar executive (ah-hem, your instructor, lol), and submit your work for a Quack Award.